Wednesday, February 28, 2024

Lichens

Curious things lichens, composite organisms where green algae or cyanobacteria live among fungal threads in a mutualistic relationship.  Neither plant nor fungus, they're a complex symbiosis that can cover large areas of suitable substrate when conditions permit.  And the wet South West of England certainly does permit.  So I get plenty of opportunities to photograph them.  Though, I have to admit, I can't identify most of them.

Take these two images of an assortment of fruticose (bushy) and foliose (leaf like) lichens growing on the trunk of Styrax hemsleyana in the cool, damp environment of the edge of Dartmoor air at The Garden House:


They're almost a mini jungle in their own right, using the fissured bark of the tree for support but not sustenance, and supporting smaller organisms such as nematodes, mites and springtails which feed on the lichen growth.

At their most spectacular, some Usnea species even produce long, dangling strands hanging from tree branches in a similar way to Spanish moss in the Southern states of the USA.  


This growth habit requires constantly damp air and lack of pollution and the western edge of Dartmoor offers the ideal conditions.  Hardly surprising, the area was once covered in temperate rain forest, although only remnants still persist but still offer suitable conditions for this type of epiphytic growth.

The growth of all of these is definitely three dimensional and, because of their size, requires focus bracketing and stacking to really capture the full beauty of these lichens or lichen groups.  This image, of one of the lichens I can identify - it's Ramalina farinacea - shows the complexity of the fruticose branching form, set alongside the early spring flowers of the cherry Prunus campanulata 'Felix Jury'.

They do make lovely subjects - and are often at their best at a time when there's not much else to photograph in the winter landscape.  I've shown this one previously - but it's worth showing again just to illustrate the complexity of a shrubby form - even if I'm not sure which lichen it is.

Time to get the identification keys out yet again, methinks.

Saturday, February 24, 2024

Al fresco focus stacking using flash


Macro and close focusing work is often limited by available light. The closer the camera gets to the subject the shallower the depth of field for any given aperture, Stopping down helps - with my 60mm macro I can use f9 or f10 without running into more than minor diffraction problems - but that does require adequate light. And in many cases that means the use of flash.  The alternative is to use more open apertures and focus stack multiple images.  But even then flash is often needed.

My Olympus Em1 mkii supports in camera focus stacking using flash - but only under certain parameters.  They are that'the shot limit in the in camera stack is 8 and manual mode (M on the top dial) must be used to set a speed of 1/50 sec to enable the camera to sync with the flash.  Additionally the charge time in the bracketing menu must be set to zero if you want to trigger a rapid sequence of shots.  Olympus flashes do this automatically but I use Godox so I have to set this up.

I would like to use my Olympus STF-8 twin flash for in camera focus stacking but it's not powerful enough to generate the rapid series of flash pulses needed to light eight images in quick succession, essential for handheld or non tripod supported shooting.  I use a Godox TT685o with an 11in softbox angled down to illuminate the subject from above. The flash is set to manual mode rather than TTL to ensure consistency between each flash. A preliminary shot or two allows me to set the flash intensity correctly and I can then switch the bracketing / stacking on.

I'm old, I shake a little, and I'm not as steady as I used to be so handholding can be a little hit and miss.  But the results, when they work, can be superb.

Fruticose lichen, possibly Usnea sp.

Chaenomeles x superba 'Crimson and Gold'

Crumpled leaves of curly kale

Lesser celadine flower
How well it will all work in the brighter light of spring and summer I don't yet know.  But I will find out.  And if it doesn't work - there's always the STF-8

Monday, February 19, 2024

Is Stock Photography worthwhile?

Photography can be an expensive hobby.  Not, perhaps, as expensive as in the film days, when every shot from a roll ate money in film and processing costs.  Nowadays I think nothing of coming home from a day's shooting with an SD card with 300, 400 or even more images captured where, pre-digital, it would be one or two rolls of film, 36 shots per roll.  And, I suspect, compared to some, I'm very economical in my shooting.

Of course there's the cost of equipment - but good quality cameras and lenses were never cheap in film days so the hardware side probably balances out.  And the second hand market is always there to reduce the cost.

But cost there is.  Which is surely why so many photographers try to make an income from their photography - and for many that means shooting for stock.

I still remember my first sale on Alamy.  Heuchera 'Chocolate Ruffles' (above) licensed on 27 June 2014 for the princely sum of $32.76, my share being $16.38.  The first of what I hoped would be a flood of sales.  I'd be rich!  I'd been published (though I never did find out where). I'd be a professional photographer!  Fame and Glory would soon be mine!

10 years later and 2757 images licensed (as of 18 February 2024) at least I can say I've been regularly published.  Rich? No - but currently $23,781.22 better off than if my images had just been sitting on my hard drive.  A professional photographer?  Far from it.  Just an ageing amateur with a bit of skill and the ability to curate and accurately keyword and caption my stock images.  Fame and Glory?  My camara probably gets more credit than I do.

So, is stock photography worthwhile?

For me, yes.  I'm old, Maria and I are both pensioners, and shooting for stock gives me the necessary impetus to get out throughout the year and keep myself occupied - though it does get physically harder as I grow older.  The money pays for my equipment and some travel without upsetting our limited household budget.  But, if I was 30 to 50 years younger, knowing what I know now, would I consider it worthwhile?

No.  It simply isn't profitable enough.  I would need to devote ten times the effort I'm currently expending to make even a paltry living.  I'd need to generate far more saleable images, distribute them among multiple agencies, explore other income streams such as print on demand, hyperactively promote myself on social media and become a slave to the work.  The fun would be gone - and all to make marginally more (possibly less) than minimum wage.

There is too much existing photography floating around the stock photo scene to make a good living solely as a stock photographer.  I'll caveat that to say 'except for the favoured few', because there are people who do make a living from their stock work.  But most don't.  And for them, stock photography isn't worthwhile except as a minor side hustle.  And even then, only if you treat it as a business and identify your market before uploading yet another image to whichever stock libraries you're enrolled with.  


Meanwhile I'll plod on with Alamy as my sole agency.  My latest sale dropped in this morning.  Taxus baccata 'Fastigiata' (above), for the grand sum of $7.40, my share being $2.96.  Doesn't sound encouraging?  It's the lowest of the month to date, my other 12 sales generating $178.99 collectively.

I'll take that - but I'll never rely on it continuing indefinitely.


Thursday, February 15, 2024

Panoramas


I like shooting panoramas.  By panoramas I mean images stitched together from multiple shots to produce either a very wide format - as with the shot of Bognor Regis beach above - or wider than normal such as the view of The Garden House in autumn below.


Because I offer my images for sale I don't generally go much wider than 2 or 3 times the normal 4:3 aspect ratio of my Olympus cameras. But sometimes you need to get an even wider view to fit everything in.  This view of the Dart estuary between Dartmouth (r) and Kingswear (l) needed the extra width to show the full stretch of the harbour.

 
Sometimes I use the panoramic stitching simply to generate a higher resolution file than would be possible with the native resolution of the camera.  The image below, of a Devon hedgebank in spring,  has a lot of detail and needed a higher resolution shot than my 16Mpx EM5 Mkii could provide.  I wasn't in a position to shoot a high res shot but I could take an overlapping sequence and merge them later in post.


Which brings me neatly to technique.  

There are many and varied pieces of equipment to generate the sequence of shots needed to generate panoramic images, ranging from simple panoramic tripod heads to full blown motorised gear used to produce gigapixel images.  The aim is to precisely align the individual shots so that they are level and produce a good overlap to allow the software to produce the best image possible.

I don't use any of them.

I often work handheld, relying on the in viewfinder level to keep the images horizontal and then steadily pan across to take a sequence of images that overlap by about a third.  I do not use the autofocus and auto modes (Shutter, Aperture or Program modes).  Excellent though they are for normal use they can far too easily misalign the focal plane and the exposure between the shot sequence.  Manual focus to set a hyperfocal distance for maximum depth of field and manual exposure to meter the brightest part of the planned shot sequence provides a consistent focal plane and exposure between the shots.  

I usually shoot in portrait orientation to generate the maximum height in the final panorama and take as many shots as is needed to cover the full width of the planned final image.  One advantage of using panoramic merging instead of a wide angle lens is the abilty to shoot without the distortion of a wide angle lens.  My 12-40mm f2.8 Pro or the 40-150mm Pro are the lenses of choice, providing the image quality needed without vignetting or the edge curvature from wide angle lenses.

Once in Lightroom I use the Merge facilities in the Library Module to stitch the photos together before processing to my taste.  Whether the results - the image below of Millbay and Plymouth Hoe is another  good example - will ever sell is another matter.  But at least I enjoyed myself.


Sunday, February 11, 2024

Isolated on white

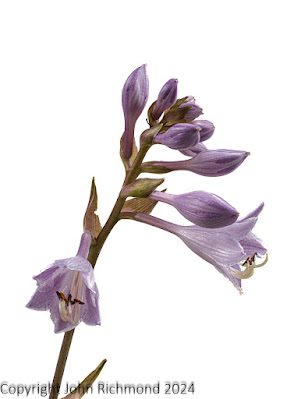
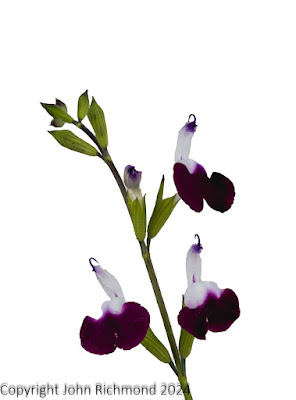
I don't have a permanent home studio.  I do have a couple of softboxes that I can fire a pair of Godox T350 flashes through for static indoor shots.  Dull, rainy days often encourage me to set up a table and backdrop and use the setup to shoot a few subjects isolated on a white background.  Subjects such as:

Hosta 'June'

Salvia 'Amethyst Lips'

With an unsophisticated setup I don't have much control over my lighting.  I can get a soft, diffused light on the subject with the twin softbox/flash combination but I can't control the background lighting in my limited space.  Invariably it comes out grey, as shown with this unprocessed RAW image of Hippeastrum papilio.


In the past I'd have exported to Photoshop and, using layers and masking, isolated the subject and filled the background with a pure white fill layer.  Even using the select tools, getting the edges sharply defined was always a fiddle, taking too long in too many cases.  

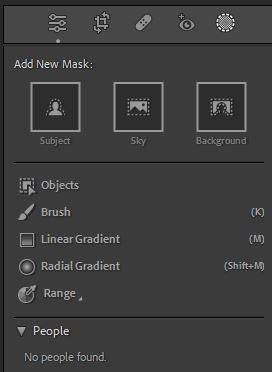
Fortunately Lightroom now has far more sophisticated masking facilities that has made the job a lot easier (though it's made my ageing computer rather slower!). So, taking the above image, I firstly use one of my presets to enhance the overall colours.  Then, using the Develop module masking tool I select the Subject mask.


By ticking the Show Overlay on I can see which parts of the subject have been masked and, if necessary, add or subtract from the mask.  With the considerable differentiation between the subject and the background Lightroom's AI driven selection had no difficulty fully selecting the subject.


The subject area can then be manipulated for colour, contrast, tone curves, saturation, clarity etc without affecting the background.  Once I'm happy with the subject I click on the Mask1 symbol in the Masks tool and select Duplicate and Invert mask.  The background is now selected.

In this case there were a couple of spots where the overlay was missing.  These were easily added using the brush tool from the Add button.


I can now manipulate the background without affecting the subject.

By setting the histogram clipping tool on I can see which parts of the background have been set to pure white by using the Exposure, highlights and white sliders.


Note the lack of red in the top right corner.  Better to deal with that using another mask to avoid disturbing the balance between the subject and the background at the edges.

The end result is a plant portrait on white, easy for an end user to cut out and drop into a page layout:


Is it worth the effort?  Yes.  It took a lot longer to write this than it did to process the image and, as I've found, there is a very reasonable market for these sort of shots.  I have a fair few on my Alamy portfolio and a good number have sold.  The return on time investment is definitely worth while.


Wednesday, February 7, 2024

Mucky puppies

Took my daughter's deerhound x greyhound to a Cornish dog field complex on Sunday for a meet up with other active dogs.  It was, to say the least, muddy.  Dogs, being dogs, thoroughly enjoyed it.  Espescially the rain filled hollow in a complex of tunnels:


I'm not sure if mydaughter's deerhound cross is looking on in reproof or approval as Narla, a bull lurcher cross, enjoyed her mud bath .


Fortunately there was also a splash pool which got some of the mud off. The rest was via a hosepipe.


Olympus 40-150mm f2.8 at ISO 800 and f2.8 for all the shots.  It's a great lens for both action and portraits in the fairly dim light of a cloudy February day.


Saturday, February 3, 2024

Photographing birds with the Olympus 40-150mm f2.8 Pro - Part 2

In Part 1 of this pair of posts I looked at my - rather inadequate - efforts photographing birds with the Olympus 40-150mm f2.8 Pro lens.  Even with the 1.4x teleconverter attached to give an effective 420mm f4 (ff equivelent) it's hardly long enough for any birds in the wild that are neither large nor accustomed to humans.  Yes, I can crop, quite heavily in some cases, and still retain a small but useable at web size file, but that's hardly adequate for my needs.


For example, the little wren above was singing his heart out on a telephone wire at the end of my garden when I crept out and captured him at 210mm, f5, 1/4000sec.  The image is fairly sharp and detailed but, to get good framing I had to crop down to 3.6Mpx from the original 20Mpx, way below Alamy upload requirements.  Put simply, I didn't have enough pixels on the subject, even at 420mm equivelent.

There are three solutions to the problem:  

  • Firstly, buy a longer M43 telephoto to give me more reach and a larger subject in the viewfinder.  Even sticking to Olympus lenses there are 4 options: the 150 - 400mm f4.5 (very expensive), the 300mm f4 (expensive), the 100 - 400mm (not as good as the previous two and still quite expensive), or the cheaper 70-300mm - but that's not really good enough at the the long end.
  • Secondly, use an adapted lens.  When I switched to M43 I bought a Viltrox Canon EF to M43 adapter to try my 70-300 f4-5.6 L lens to get me out to 600mm ff equivelent.  It had a fair bit of reach but the autofocus was way too slow to be of use for anything other than static subjects.
  • Thirdly, lure the birds to the photographer rather than go hunting them.  In other words, feed them and/or provide bathing and nesting facilities. Definitely the cheapest solution but you are limited to what visits in your locality.
Given my budget limitations it came down to Solution 3.

With feeders and bird baths in both front and rear gardens, all visible from our windows, it's been fascinating to watch the birds come and go.  Yes, I'm generally shooting through glass but that's nothing a little post processing in Lightroom won't fix.  Here's some results:

Male blackbird on a bird bath

Great tit on a feeder

Robin in flight to a feeder

Sparrows on our improvised bird bath

Starling on a feeder support

It's well away from my usual plant and garden photography but it's fun and occupies a few hours.  I'm even thinking of getting a hide so I can get even closer and without window glass in the way.  Meanwhile, I've seen blue tits investigating our nest boxes.  Pro capture opportunities for 2024, perhaps.